Wednesday, February 24, 2010

Brew: Deciding to Make an Inebriant

I don't know what gave me the idea that I could make a half decent home-brew.

I had been served several atrocious home-brews in the past, my uncles being the worst. They were often overly sweet, under-carbonated and served in plastic pop bottles. My initial desire to make my own booze came during a slow time at work, when shifts were scarce and my bank account was taking a nose dive. Not wanting to give up one of my favourite pastimes, I started looking into making an inebriant. My first idea was moonshine. After a little research, I decided I wanted to avoid going blind, and keep my apartment unexploded. The next liquor I looked into was alcoholic cider. The process was very easy: make an apple cider, add yeast, and then wait - but the final product was very dry and bland. After having this boring beverage, I figured beer might be more interesting, both to drink and make. I was also spurred on by having drank the first palatable home-brew I've ever had, from my friend Johnny Deshman. Realizing it was possible to make my favourite beverage at home, for next to no money, I began my first brew.

The first beer I brewed was a traditional American brown ale. I brewed it using ten dollars of equipment bought from a wine making store at Ossington and Queen, and picked up the ingredients from Fermentations on Danforth. I wanted to avoid those ugly plastic bottles that are sold by brewing stores, so I started a drinking competition with Dave and Jacob to drink as many swing top bottles of beer as possible. I will never drink another Grolsch again.

The brewing process itself was pretty nerve-wracking; my only instructions were from a 2 page article out of Mother Earth News, and early on in the boiling of the malt, I experienced a flash boil. This is where the sugary syrup from the malt "jumps" once it reaches the boiling point, spilling over and creating an incredibly sticky mess.  Difficulties aside, the end product was impressive.  All of the taste-testers were overwhelmingly positive, and even I was surprised by the quality of the beer.

I hope the success of my first beer wasn't beginners luck, and I'll know in about a month, when my second brewing project, a coffee porter, is ready to drink. The one complaint I had about my first beer was that it needed more hops. Loving a disturbingly hoppy beer Jacob, Dave and I decided to brew the hoppiest beer known to man, an IPA. To give it a twist, I decided to do an IRA, India Red Ale, by adding a healthy dose of munich malt, which will give a distinctive red tint and a caramelly flavour. By this, my third, attempt I had mastered the brewing process. The entire house, and probably street, stank like a brewery in no time. The IRA is now fermenting in our broom closet, which manages to contain most of the smell. It'll be ready to bottle in a month, and ready to drink in a further two months.

Tuesday, February 23, 2010

Vegetable: Planning the Garden


Last year we were somewhat hurled into the gardening process. Having no access to a back or front yard and only a small west facing balcony we had looked to the roof to produce our beets and carrots. Using the old City of Toronto recycling bins gathered from around the neighborhood we had nice deep soil to plant root veg. Unfortunately, and understandably, our landlady didn't want us tromping around on the roof watering and planting vegetables. She kindly and generously offered us the front yard for gardening. This was a great opportunity but came a little late in the season, the end of May, well after the optimal time for sowing seeds. In order to make sure we had some production we planted with haste and with little planning. As Franka, our next door nonna, quickly made us aware we planted much of our veg to close together. We also didn't do any companion planting, or plant with garden cycles in mind.
This year is going to be different. We invested in some books to help us with planning our garden. One was given to me by my grandma called The Canadian Gardener by Marjorie Harris. Harris is one of Toronto's gardening gurus. The other we bought from Lee Valley, called Canadian Vegetable Gardening. I have only found books that specialize on dealing with the Canadian climate to be useful, other books don't address the long cold season or help with growing after frost.
This year we also have much more space to grow. This means a wider array of vegetables and the opportunity for more creativity in planting. Our little balcony will be used exclusively for herbs, such as rosemary, sage, oregano, thyme and marjoram. In the front and backyard we will have mixtures of plants growing on trellises with shade-tolerant vegetables
growing in their shadows. We will also plant vegetables that have compatible root patterns next to each other such as cabbage next tomato and beans on trellis next to lettuces and carrots. In seeking a completely organic garden we will use natural insecticidal flowers such as nasturtiums and chrysanthemums. We may also scatter some Cannabis Sativa throughout the garden for, according to my grandmothers book, its soil improving pathogenic micro-organisms.
Last week we began sowing seedlings for slow growing herbs such as rosemary, sage, thyme and oregano so that we can have a luscious herb garden for the entire summer and dry lots of herbs to get us through the winter. The simple process of merely sowing seeds in egg cartons got me really excited for the spring. Watching plants mature throughout their life cycle and produce their delicious bounty is a great pleasure for me. The fact that I can't wait to get out in the garden and double-dig all the soil, a grueling process, attests to how much I miss the garden and how difficult even this mild winter has been.

Monday, February 22, 2010

Larder: Wild Boar Pancetta

Our very first pancetta is ready.
This one is from a beautiful Ironage boar belly.  This breed is a cross between a Tamworth sow, and a male wild boar.  The fleshy taste of the wild boar combines with the fattiness of the Tamworth pig, giving the meat incredible flavour.  Tamworth pigs are known as "bacon pigs" because of their wide bellies, making this crossbreed a natural choice for a flat, Italian style pancetta.

I did a salt-box method cure, where the meat is heavily dredged in your cure mixture, and left to sit until stiff, and cured through.  For this piece, the meat felt reasonably stiff, and no longer completely "raw," after five days.  After rinsing, I give it a quick rub with bay leaf, black pepper, and red chili.

The drying took about two months.  Generally, we're looking for about a 30% weight loss from moisture.  This one didn't quite lose that much weight - since there is so much fat, which doesn't really dehydrate.  Curiously, there was no mold growth throughout the entire drying process.

The thing I'm finding difficult about all this meat curing, is the inability to taste as you go.  It's very frustrating to cure a cut of meat, hang it, and find out it's too salty three months down the road.  Nothing could be more frustrating.  

Not so with this pancetta.  The flavour came out incredible.  Very nice balance of salt; pleasant earthiness from the bay and peppercorn, and a subtle kick of heat to finish.  We're very impressed by the astounding creaminess, and gorgeous texture of the fat.   Pretty decent for a first go round, and the first cure without an explicit recipe.

Sunday, February 21, 2010

Trinity Reach Farm

It all began the spring of 2009.  What started as a small herb garden on a second floor patio, expanded into a rooftop recycling-bin garden, with Paul and I scrambling up precariously perched ladders to water carrots, beets, and radishes.

When our landlady put the kibosh on somewhat hazardous experiment, we looked to the front yard as a new home for our burgeoning interest in horticulture.  Much to the chagrin of our downstairs neighbours, we turned over a small section of lawn, and began successfully cultivating a more serious and productive garden.

Living in a predominantly Italian neighbourhood, it wasn't long before others began taking notice... our neighbour, Franka, found our new project especially comedic, given that two young men were following in the footsteps of nonnas all over the street.  Her unsolicited, but much appreciated advice in broken english helped us to realize that being a sustainable household is not just a trend for the environmentally savvy, nor necessarily a hobby for the under-employed, and that yes, we had, in fact, planted our cucumbers too close together.

With vegetable production ramping up, we turned to canning as a way to keep our season's crops from spoiling.  This simple act of preservation piqued our interest in other forms of preservations.  Around this time, we started some small home charcuterie projects, beginning with fresh sausages, and duck prosciutti.  With some reasonable successes doing the easy stuff, a small bar fridge was purchased, and larger, more challenging pieces of meat were begun curing.

After the timely, and somewhat inevitable decline of our downstairs neighbour's relationship, Paul's brother Dave staked claim of the first floor apartment.  We promptly turned over the lawn in the back yard, clearing room for an even larger garden, and more ambitious projects.

Ideas began spilling out at a rapid pace.  A smokehouse; chicken coupe; fire-pit; compost... perhaps fueled by a few too many home-brews, our small herb garden had turned into a full-fledged small-scale urban-farm, overseen by three inexperienced twenty-somethings.

Tuesday, February 16, 2010

Curd: Making The Cheese Press


Our first foray into making cheese was a clumsy affair. We used a recipe from mine and Dave's grandmothers copy of the Joy of Cooking, one of our go to books. Our cheese press was comprised of a coffee can, a circle of wood, and several bricks gathered from the backyard. The process went well and seems to have produced something resembling cheese, its still aging and we should be able to taste it in another week or so. We attempted to dye the wax on this cheese with red food colouring which obviously didn't provide an even coat. We also had difficulties with the bricks used to press the cheese when they toppled over in the middle of the night.
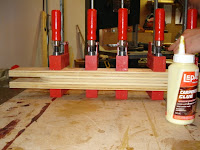
We decided our next attempt at cheese making will need a proper cheese press. Dave came up with some plans and we have started putting it together in our dads wood shop. The materials used for the press will be entirely plywood scraps gathered from old projects. So far we have glued together the base of the press and the arms but will have to connect it all together. We are still undecided on what to use for weights at the end of the lever.

I can see a lot of benefits from producing our own cheese. One obvious benefit is the enjoyment of the cheese making process. Another benefit is not having to spend the fortune it costs for the hard cheeses I use in every day cooking like parmigiano reggiano, piave or toscano. To do these more complicated cheeses we are going to need bacterial cultures that we are still in the process of acquiring. I've been talking to the artisan cheese makers at the Wychwood Barns Farmers Market to see where they get their cultures or if I can get some from them. Ruth Klahsen from Monteforte Dairy has been particularly helpful. I am also trying to find some raw milk sources, hopefully my buddy Leland who is expecting to get some goats on his farm near Cambelford this summer will have excess milk.